COMPREHENSIVE, MEDICAL & SURGICAL WEIGHT LOSS MANAGEMENT PROGRAMS
Minimally Invasive Bariatric & Metabolic Surgical Services

Laparoscopic Gastric Bypass Roux Y Limb [75-150cm]
Last Technical Rev. Dec 31, 2015
LGBRY: STANDARD TECHNIQUE [Last Validation Dec 31, 2015 - PSJMC]
Access to Standardized PREFERENCE CARD
All Service Technical Variations MUST BE reported via OLP
STEP 1: POSITION AND PRE PROCEDURE CHECK
- Insert 2 peripheral IVs - Large Bore / CVP is not possible.
- Place stools on Right and Left Side of the patient.
- Position Patient as follows:
STEP 2: ANESTHESIA - INDUCTION - ETI
- IV Injection: 5000 U Heparin SC
- Patient to be fully paralyzed.
- Gastric Tube-balloon for calibration at bedside.
STEP 3: PNEUMOPERITONEUM CREATION
- Verress Needle - MAX IAP: 15 mmHg
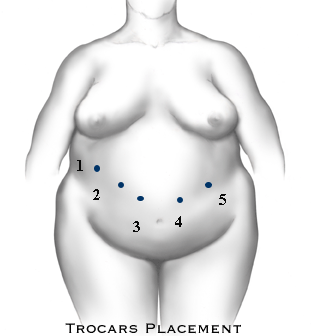
STEP 4: TROCARS PLACEMENTS
- Explore Intra-abdominal cavity [ 30 Deg 10 mm Telescope]
- Insert Hepatic Retractor, deploy and retract the transverse colon cephalad.
- Expose Ligament of Trietz.
STEP 5: CREATING THE ROUX Y LIMB
- Locate the Ligament of Trietz.
- Measure 30 - 40 cm distal to the ligament of Treitz.
- TRANSECT the Small Bowel with an ENDOGIA UNIVERSAL - TAN 60 ROTICULATOR CARTRIDGE. Tip of cartridge should not go beyond 1.5 cm into the mesentery.
STEP 6: MEASURE ROUX Y LIMB [75 to 150 cm - based on BMI]
- Use a laparoscopic bowel clamp with an open span of 9 cm.
- Measure the Roux Y Limb from the transected, stapled tip of the Limb.
Inexperienced surgeons or fellow, repeat measurements twice.
STEP 7: PERFORM JEJUNO-JEJUNOSTOMY
- TYPE: Side-to-Side JJ - ENDOGIA
- Approximate the two limbs of small bowel.
- Placing SOFTSILK Suture between two limbs with ENDOSTICH.
- Suture at exact anti-mesenteric border on small bowel >
- At 0.75cm from stapled tip of jejunum,
- At measured site on the Roux Y Limb.
- Use SONICISION to perform enterotomy [sites of stapler insertion].
- On jejunum, at exact tip closest to suture.
- On Roux Y, 1 cm from suture & 0.5 cm from mesenteric border.
- Insert ENDOGIA UNIVERSAL TAN C - to 6 cm in both enterotomies.
- Close - Check tissue compression - fire slowly.
- Remove stapler.
- Check Staple Lines for integrity and bleeding. Control bleeding sites with clips.
STEP 8: CLOSE THE MESENTERIC DEFECT
Using the ENDOSTICH close the mesenteric defect with a running 0 Suture.
STEP 9: CREATING THE GASTRIC POUCH
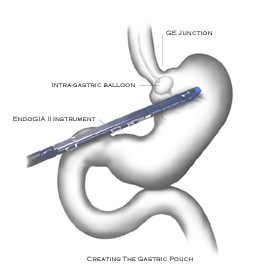
An intra-gastric tuve is inserted by the anesthsiologist. The tip of the tube MUST BE IDENTIFIED in intragastric position. Once identified, the balloon in inflated with 30 cc of normal saline. The inflated balloon is then pulled back snug against the GE junction.
An additional trocar is inserted in epigastric positioin [12mm VERSASTEP].
A passage is created with the blunt grasper between the lesser curvature of the stomach and the vagus nerve. The vagus nerve is left intact. The passage is enlarged with the same grasper to a size of 4 mm into the lesser sac.
The ENDOGIA UNIVERSAL loaded with a PURPLE 60 mm cartridge is inserted in the abdomen via the most lateral 12 mm trocar and thelargest jaw into the passage, into the lesser sac. The stapler should be oriented so the posterior aspect of the "to-be-created" gastric pouch is larger than the anterior aspect. The superior aspect of the cartridge should be against the anterior aspect of the GE junction. The cartridge is closed and the stapler fired slowly.
The stapler is reloaded with now TAN 60 mm cartridges and fired to the greater curvature around the balloon. The balloon is used as a calibrating device.
CAUTION: It is at times safer to create a triangular gastric pouch extending toward the spleen versus a totally circular gastric pouch around the balloon.
A holding suture is placed on the lesser curvature of the gastric pouch [SILK 0] with the ENDOSTICH INSTRUMENT.
The anesthesiologist will push the tip of the gastric tube forward creating some counter tension in the gastric pouch and exposing the tip of the tube to the surgeon.
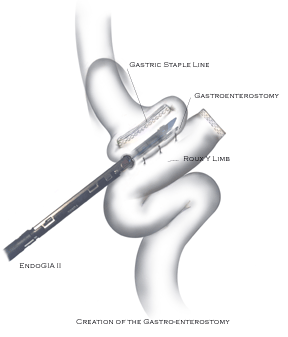
Using the SONICISION device a small 3mm gastrotomy is placed at the tip of the tube closest to the lesser curvature. An enterotomy is then created 5 cm from the tip of the Roux Y Limb exactly at the anitmesenteric border.
The ENDOGIA loaded with a TAN 60 Cartridge is inserted via the epigastric 12 mm trocar . The staple bearing large jaw is inserted first in the enterotomy; the stapler is then moved cephalad and the smaller jaw is inserted into the gastrotomy. Using a grasper from the most lateral 12 mm trocar, the holding suture is retracted and used to guide the stapler.
The stapler is inserted up to the MARK 3. Expert baraitric surgeons can eventually decrease the size of the gastroenterostomy by inserting to MARK 2.5 or 2.
VERIFY THERE IS NO EXCESSIVE OR CORRECTABLE [OMENTAL TRANSECTION] TENSION OF THE ANASTOMOSIS BEFORE FIRING.
The stapler is fired slowly and removed.
Anesthesia will advance the gastric tube through the anatomosis into the Roux Y Limb and will stent the anastomosis during the suturing phase.
The anterior aspect of the open anastomosis is then sutured closed with the ENDOSTICH INSTRUMENT [Low experience surgeons - use SILK 0 / Experts can use ABSORBABLE SUTURES].
Once the anastomosis is closed, the tip of the anastomosis is reinforced with a SILK suture incorporating an omental piece of fat as an omental patch.
STEP 10: TESTING THE ANASTOMOSIS
A bowel clamp is placed on the ROUX Y limb distal to the gastro-enterostomy. The gastro-enterostomy is submerged under saline.
The Roux Y limb is inflated with air via the aspiration port and tested for air leak.
The gastric tube is removed. The bowel clamp is removed.
STEP 11: Placing a Blake drain
A Blake drain is left in the abdomen by the gastro-enetrostomy.


Tan 60 Roticulating Cartridge


- [Position 2,3,4,5] 12 mm Versastep Trocars
- [Position 1]5 mm Allied BLUNT
ENDOGIA Standard Length


